
Hooray! You’ve gotten your FREE editable graphic organizers built with English Language Learners in mind! Now is your next step: how to imbed language scaffolding strategies within these resources!

The power of a soft copy
Having editable templates is KEY in differentiating for all the learners in your class. When you have the original, you can quickly make adjustments, sometimes even creating multiple versions of the resource for one lesson! Check out my example below!

Language Scaffolding Strategies for ELLs!
None of these scaffolded supports are earth-shattering, but they can have an important impact on your English Language Learners. My suggestion is to try out 1-2 at a time and see how your ELLs respond. View it as an experiment and reflect:
- Which language scaffolding strategies really helped my ELLs with work that would otherwise be frustrating?
- How did the scaffolds impact the integrity of the task? Do I still get to see students’ mastery of an objective?
- What happens when I do/don’t include this scaffold?
Now, on to the language scaffolding strategies!

Provide an example
This strategy is very straightforward! Provide a written example that students can reference as they work through the activity. This written example should NOT take the place of thorough live modeling of the task; rather, it is to supplement it!
Include a word bank
Consider the words students are likely to use in the activity. Then, provide them in a word box. Be sure to be explicit about the word box while modeling: do the students NEED to use the words or are they there just as an option? Conduct a short think-aloud about how you might use them. “For this next idea, I want to write about recycling as a way to help the planet. Oh! Recycling is one of the words in the word box. Now I don’t need to use a lot of brain power to remember how to spell it – it’s right there for me!”
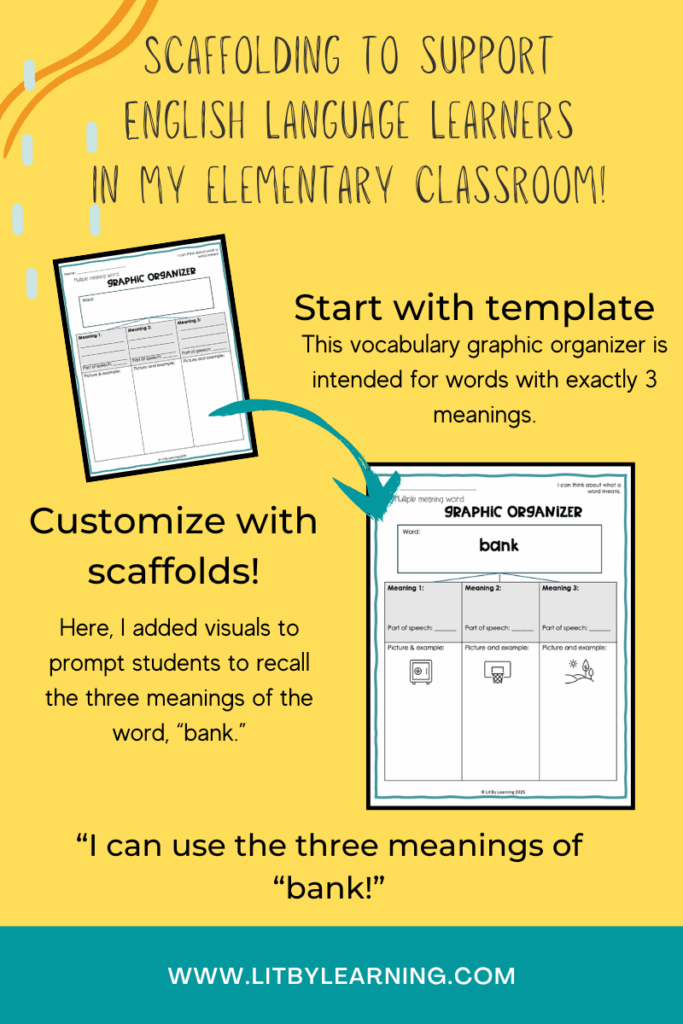
Add in visuals!
This is a real powerhouse strategy that will certainly support your English Language Learners AND your entire class! Where can you get your visuals? Here are some ideas:
- Screenshots: If you are using a video as an instructional tool, simply capture screenshots to include as visuals on a printed document! The continuity from the teaching tool to the student work creates clarity for your learners!
- Drawings/Sketches: Don’t over-think this! Print out a copy of your graphic organizers & take a pen to it before making student copies. Especially if your drawings match what you modeled on the board or drew for a mini-lesson, these sketches can be very valuable!
- Clip art / Google Images: Drag and drop clip art you have saved on your device or search for images that will support students!
- Icons/Emojis: I love to use emojipedia.org to quickly add emojis to resources. Students are almost always already acquainted with them and their meanings! I also love the simplicity of inserting icons. Sometimes more complex clip art and Google images take away from the clarity of the assignment. Simple can be better!
A different way to use this strategy is to create clear drawing/sketching places for students to draw their own picture!
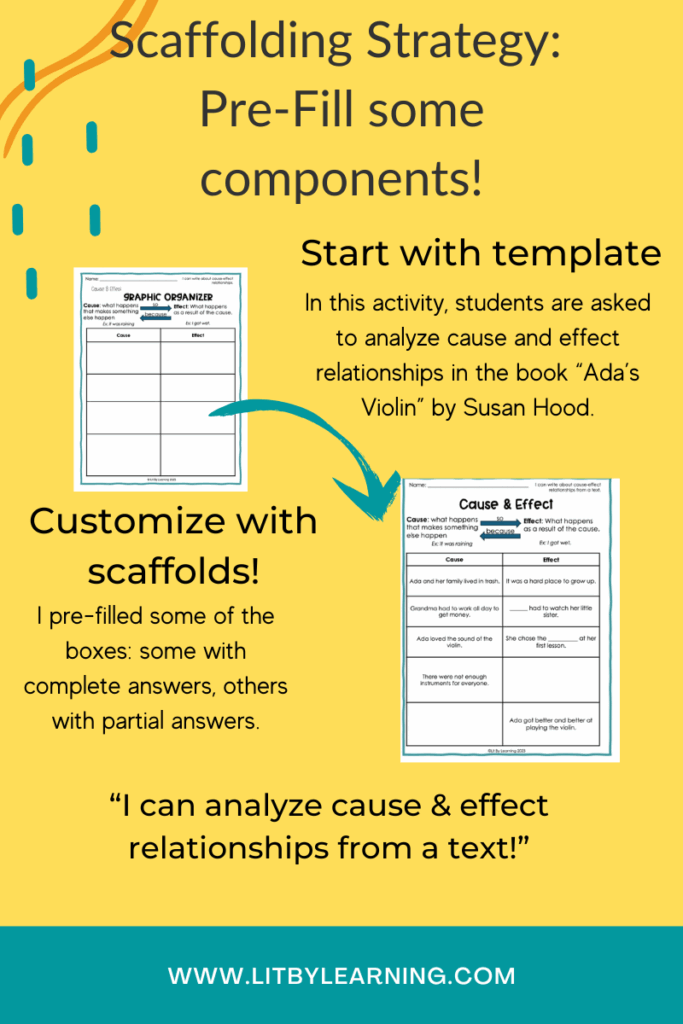
Pre-write / Pre-fill some sections
This is similar to including an example, but if students can still demonstrate mastery by doing fewer problems, this can be a great scaffold. Check out how I did this in the example graphic organizer below!
Embed sentence starters
This super easy scaffold is wildly effective, especially for students who are still building their writing skills! You can embed sentence starters right in the resource or provide several in an “idea box” on the side. Once again, ensure that you include how to use the sentence starters in your modeling!

Add think-aloud boxes
Take some of the thinking prompts from your essential questions and/or your lesson and include them on the graphic organizer! This is a great reference that triggers students’ memory and help them move from stuck to getting started.

Include a checklist
Including a simple checklist can be so helpful for students, especially those super-concerned with doing things “right!” This can take the form of a grammar checklist (I used my best spelling, I started my sentence with an uppercase letter, etc.) or a guide to remind students of all the components they’ll need to include (I have an introduction, I wrote my opinion, etc.) It’s always satisfying to format a checklist to include boxes to check items off!
Incorporate student choice!
Research has shown that incorporating student choice is integral in students’ motivation and engagement with learning. This can be especially true for English Language Learners who are often looking for more of a sense of safety and autonomy as they learn language and content at the same time.
Here are some ways that I include choice within written activities:
- Where to start: Students can choose where to start on their assignment. On a Venn Diagram, maybe they want to start with similarities, then move to differences. In a KWL, they may opt to list out their questions before noting what they already know.
- How they show knowledge: Depending on the assignment, I frequently offer both drawing and writing as choices for completing a graphic organizer. Within writing, students are welcome to use their home language (L1) or English. I’ll highlight these choices during modeling, saying something like, “Some of you will choose to draw and others will choose to write! Other people will show me what they know by doing a bit a both. These are all good options!”
- Working solo or cooperatively: I will often offer students a choice about how to complete their work: solo or alongside a partner.
Include tools for self-reflection!
This scaffold can be as easy as an agree/disagree prompt at the bottom of the organizer: I can write my opinion effectively. I use emojis like thumbs up/thumbs down or a clear 1-5 disagree to agree scale. This gives students a valuable moment to reflect – and helps me as the teacher to understand how they’re feeling about a certain objective.
Language Scaffolding Strategies: what did I miss?
These are just some of the language scaffolding strategies that I’ve tried in my own classroom, but I’m confident there are many more ideas out there! What scaffolding strategies have worked for you? Please include them in the comments section below!
